Classic and Classic Ekstra roof profiles
Price from 9,62 € / m² incl. VAT7,95 € / m² excl. VAT
Excl. VATIncl. VAT
The price depends on the coating, material thickness and quantity ordered.
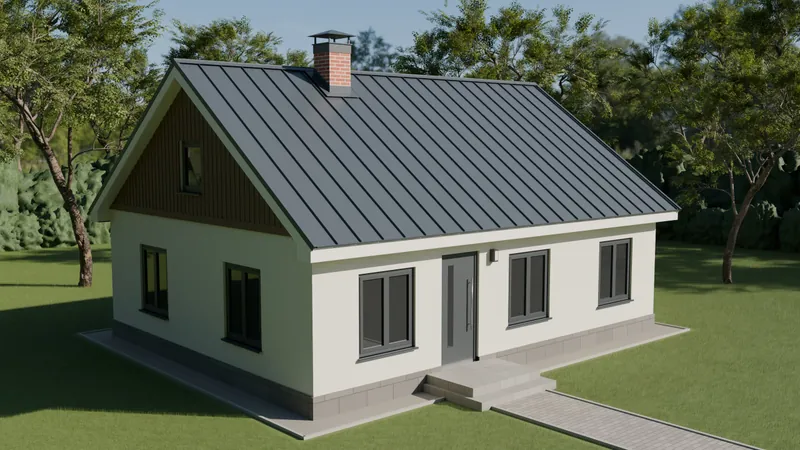
Classic house, Classic, RR23 Dark grey See how it looks on a house Classic in the roof visualiser - choose the colour, rainwater system and accessories.

The Classic profile with the hidden “Click” fixing system gives the roof a clean, modern look with no visible screws. The profile is ideal for both new buildings and renovation, and can be used not only for roofs but also for facade cladding. There are two versions – Classic with a smooth surface and Classic “Ekstra” with two decorative ribs in the middle of the profile.

Technical specifications of the standard Classic profile


Standard Classic profile cross-section and dimensions

Use Roofing, facades
Material thickness 0,50–0,60 mm
Profile height 35 mm
Cover width 480 mm
Coatings Galvanised, Al-Zn, Matt Pol, Pural BT, Pural BT Matt
Minimum / maximum profile length 1200 –10 000 mm
Minimum roof pitch 15° (¼ from horizontal)

Technical specifications of the Classic “Ekstra” profile


Classic Ekstra profile cross-section and dimensions

Use Roofing, facades
Material thickness 0,50–0,60 mm
Profile height 35 mm
Cover width 480 mm
Coatings Galvanised, Al-Zn, Matt Pol, Pural BT, Pural BT Matt
Minimum / maximum profile length 1200 – 10 000 mm
Minimum roof pitch 15° (¼ from horizontal)

General information

The main advantage of the Classic profile is its hidden fixing system: the screws go through the side edge of the panel, not through the surface, so no fixings are visible on the finished roof. The panels join with a unique “Click” lock system – the edge of each following panel slides under the previous one and locks in place.

Classic “Ekstra” differs from the standard version by two decorative ribs in the middle of the panel, which give the roof extra visual depth and contrast. Both versions are compatible and use the same flashings.

An important aspect of installation is thermal expansion: with a temperature difference of 60 °C, a panel can expand by up to 1 mm per metre. The length of an 8-metre panel can differ by up to 10 mm between winter and summer. That is why the panel edges have factory-made slotted holes that compensate for this movement.

The Classic profile is also available with the sound-absorbing material SoundControl →, which reduces rain noise indoors and prevents noise from vibration caused by thermal expansion.

Each side of a Classic panel has a pressed-in lock – one side is the “male” part, the other the “female” part. When the next panel is installed, its edge is slid under the joint area of the previous panel and pressed down by hand or with a soft-soled shoe. The joint locks immediately, and the panel is held securely with no visible screws on the surface.

The technical specifications – width, height, thickness, coatings and minimum pitch – are identical for both. Only the design differs: Classic “Ekstra” has two decorative ribs in the middle of the panel, which visually look like two narrower profiles in one.

Yes – Classic and Classic “Ekstra” are suitable for both roofing and facade cladding. The hidden fixing system is especially well suited to facades, because no fixing marks are visible from outside.

The recommended minimum pitch is 15° (¼ from horizontal). In some cases, by agreement with the roofer and after assessing the specific conditions, the pitch can be lower – but not below 8°. At a lower pitch, there is a greater risk that meltwater will not drain away quickly enough.

Yes – Classic is available with a factory-bonded
SoundControl
sound-absorbing layer that significantly reduces rain noise indoors and reduces noise from thermal expansion. It is the most convenient solution compared with separately installed sound-absorbing elements.

The Classic profile has a full range of flashings for a watertight and neatly finished roof at the ridge, verges, eaves, valleys and wall abutments. All flashings are available in the colours of the Toode RR catalogue, so they blend in with the overall look of the roof.

Flashings


lisaplekid copy copy 1 1024x385 1

A – Ridge

Closes the roof at the ridge, keeping moisture, dust and insects out from under the roofing. The ridge is fixed to the ridge support and

ventilation element (B) with 4.8×20 mm screws, one per Classic panel. Ridge overlap – 100 mm; the sheets are not joined in the overlap area.

B – Ridge support (under-ridge flashing)

A required element for the Classic profile – it acts as an intermediate piece between the top edge of the panel and the ridge. It is screwed only to the Classic panel (not to the battens) with one 4.8×20 mm screw per panel, 20-30 mm from the outer edge of the ridge. It compensates for the thermal expansion of the panels at the ridge and replaces a ridge seal.

C – Eaves flashing

Fixed to the first batten before the Classic panels are installed. The eaves edge of the panel is slid behind the starter sheet and secured – this way the eaves area is a double sheet without through-fixing screws. Pay special attention to the outer edge of the starter sheets, because it determines the alignment of all rows of panels. Starter sheet overlap at least 50 mm.

D – Verge

Closes the edge of the roofing and stops rainwater from getting under the profile from the side. The verge is fixed from the side to the board with 4.8×28 mm screws and from above through the Classic panel to the battens with 4.8×20 mm screws (spacing no more than 500 mm). Verge overlap – at least 50 mm.

E – Abutment

Makes a watertight joint between the Classic panel and a perpendicular cross wall (for example a firewall or the edge of a higher terrace). The top edge of the panel is turned up to block water from getting in. The flashing is fixed to the ridge support and the support sheet – not directly to the battens.

F – Stepped abutment

Used where a wall runs lengthwise – parallel to the panels. The step on the inside of the sheet covers the first seam of the Classic panel. If the panel has been cut, its cut edge is turned up at a right angle under the sheet.

G – Valley

Keeps the roof watertight in the valley – where two roof slopes meet at an internal angle. For the Classic profile, the valley must be at least 300×300 mm in cross-section (400×400 mm is recommended for complex valleys). The panel ends must not be in direct contact with the valley surface – a 3×10 mm self-adhesive seal is used between them.

H – Panel extension (joining piece)

Used when panels have to be joined lengthwise. The extension is placed under the panels at the joint and keeps it watertight. The overlap must be at least 250 mm; the joint must be placed over a batten. The joints must be staggered – no closer than 700 mm to each other.

Fixing screws

Screw Use Consumption
4.2×25 mm without sealing washer small head, stainless steel Fixing Classic panels to the battens (through the side edge of the panel) ~6 pcs/m²
4.8×20 mm with sealing washer drill point, hot-dip galvanised Fixing flashings to Classic panels (sheet to panel) ~5 pcs/lm
4.8×28 mm with sealing washer sharp point, hot-dip galvanised Fixing flashings to timber as needed

The Classic panel fixing screw (4.2×25 mm) goes through the side edge of the panel – this is the essence of the hidden fixing system. As the screw does not go through the panel from above, no sealing washer is needed to stop water getting in through the screw hole. The only hole in the panel surface is not visible, because it is covered by the next panel.

We recommend ordering everything at the same time to guarantee that the colours match. The flashings are made from the same coated steel and in the same colour, so the colour match is more accurate when ordered in one batch.

No – the Classic profile has its own specific ridge and ridge sealing and support sheet (B). The different joining system means that tile profile flashings are not compatible with the Classic installation principles.

This profile is available in the coatings listed below. The properties of each coating – thickness, corrosion and UV resistance, galvanising and warranty – are compared under Metal roof coatings.

Colour chart

The table shows which colours each coating is available in. Colours on screen are approximate – for an exact choice, ask for physical colour samples.

RR11 - Dark green
RR20 - White
RR21 - Light grey
RR22 - Grey
RR23 - Dark grey
RR2H3 - Anthracite
RR29 - Red
RR32 - Dark brown
RR33 - Black
RR40 - Silver metallic
RR41 - Dark silver metallic
RR750 - Brick red
Zn - Galvanised
AlZn - Aluminium-zinc
* Approximate colour samples

Colour / coating table

MATT POL PURAL BT PURAL MATT BT PVDF Natural metal
RR11 ●
RR20 ●
RR21 ●
RR22 ●
RR23 ● ● ●
RR2H3 ●
RR29 ●
RR32 ● ● ●
RR33 ● ● ●
RR40 ●
RR41 ●
RR750 ●
Zn ●
AlZn ●

Pural BT or Pural BT Matt gives the highest protection (RC5+) and the longest warranty – the best choice in the long term. Matt Pol is a good choice with an attractive matt look at a lower price. A galvanised profile is suitable when no coated finish is needed. Al-Zn is recommended in more aggressive environments – on the coast or in industrial areas.

“White rust” is a salt deposit that forms on a galvanised surface when damp material is stored in closed packaging without air circulation. It does not always mean permanent damage, but galvanised panels should be stored outdoors for no longer than one week, and air circulation must be provided after that. For details, see the file “White rust on galvanised steel” in the documents section.

Al-Zn (55% Al + 43.4% Zn + 1.6% Si) gives 2-6 times higher corrosion resistance than ordinary galvanising. The aluminium forms a dense protective oxide layer on the surface, while the zinc gives cathodic protection to cut edges. That is why the Al-Zn profile is recommended in coastal climates and other aggressive environments where ordinary galvanising would not be durable enough.

Yes – the Classic profile is available with a factory-applied SoundControl sound-absorbing material. It significantly reduces rain noise indoors and also prevents vibration caused by thermal expansion. More information and ordering –
Classic with SoundControl →

Yes – galvanised material is shiny silver-grey at first, but over time, exposed to the atmosphere, a protective zinc carbonate layer forms and the surface becomes evenly matt and darker. This is a natural and normal process that does not reduce the protective properties of the material.

An individual order is possible in some cases. Contact our sales department with the colour code you want – we will assess the options and the minimum order quantity.

For the Classic profile, dark colours are in the highest demand – RR33 Black, RR2H3 Anthracite and RR32 Dark Brown – as they emphasise the clean lines and modern design of the profile. Matt coatings in these colours are especially popular in new construction projects.

In this section you will find the Classic profile installation instructions, guidelines for receiving and storing materials, and a document on storing galvanised steel. Reading the documents before starting work keeps the warranty valid and helps avoid the most common mistakes. Most documents are in Latvian.

Information on receiving and storing products

The document describes how to receive the delivered profiles correctly, what to check on delivery and how to store the material before installation. Following these guidelines keeps the material warranty valid and prevents damage to the coating during transport or storage.

Remember: coloured panels in sealed packaging may be stored for no longer than four weeks; galvanised panels – for no longer than one week. After these periods, the packaging must be opened and air circulation provided.

Download the guidelines (PDF, LV) →

“White rust” on galvanised steel

This document is especially important if you have chosen a galvanised or Al-Zn steel Classic profile. It explains what “white rust” on galvanised steel is, how it forms, whether it harms the material and how to prevent it by storing the material correctly. In damp conditions, galvanised steel in closed packaging without air circulation can develop a white salt deposit – so-called white rust – within a few hours.

Download the document (PDF, LV) →

Yes – the warranty is valid whether the work is done by a certified roofer or by the owner, provided that the installation is carried out according to the SIA Toode installation instructions. Using the correct battens, starter sheet, screws and flashings is an important condition for keeping the warranty.

Not always. White rust is a zinc oxide/hydroxide deposit on the surface of the material that forms when moisture collects between panels stored in sealed packaging. If the damage is superficial, it can often be cleaned off. In more serious cases, the zinc layer may be affected. For more information, see the document “White rust on galvanised steel”.

Coloured panels in sealed packaging may be stored for up to four weeks. Galvanised panels in sealed packaging – for no longer than one week, because white rust can form when moisture collects. For longer storage, the packaging must be opened and air must be able to circulate between the panels.

Yes. The SIA Toode Classic profile has CE marking according to standard EN 14782. If you need a declaration of performance for the project documentation, please contact our sales department.

Toode Classic profile: measuring the lengths and installation

The video shows how to calculate the lengths needed for a Classic roof correctly and in what order it is installed.


The name “Classic” describes the classic design of this profile, which has been used for decades and is very popular throughout the Baltics. Classic panels join with a unique “Click” lock system, which keeps the joint between panels hidden. The Classic “Ekstra” version has two decorative ribs in the middle of the panel, giving the roof extra visual depth.

Uses of the Classic profile:

  • Family houses
  • Apartment buildings
  • Holiday homes and summer cottages
  • Saunas
  • Public buildings
  • Facade and wall cladding

The job of a roof is to protect the interior from the weather – rain, snow, sun, wind and temperature changes. The Classic profile does this with a hidden fixing system that prevents water getting in through screw holes, and with a durable polymer or metal coating that protects against corrosion.

The Classic profile is also available with a factory-applied sound-absorbing layer – Classic with SoundControl →


Installation summary

Installing the Classic profile is different from an ordinary profiled sheet – the hidden fixing system and thermal expansion compensation require the steps to be followed carefully. Below is a summary of the instructions. The full PDF instructions are available under the “Documents” tab.

Slight waviness of Classic and standing seam roof sheets is acceptable and does not in itself indicate a material defect. How noticeable it is can depend on several factors:

  1. Quality of the deck and battens. The battens must be built precisely, evenly and calibrated. Unevenness in the roof structure can also become visible in the finished roof surface.
  2. Quality of installation. The roof sheets must be installed according to the installation requirements. The fixings must not be overtightened, because steel needs to be able to expand and contract naturally with temperature.
  3. Steel thickness. A thicker steel sheet is usually stiffer and looks flatter. For example, 0.60 mm steel will be less prone to waviness than a thinner material.
  4. Surface coating. A matt, textured coating visually reduces light reflections and therefore also makes any waviness of the sheet less noticeable.
  5. Natural properties of steel. Internal stresses can arise in the sheet during production, transport, installation and use. Under temperature changes and mechanical loads, they can show as slight waviness of the sheet surface.

That is why the visual result of a Classic or standing seam roof depends not only on the material itself, but also on a correctly prepared roof structure, quality installation and the chosen steel thickness and coating.

Delivery and storage

When receiving the goods, check that all ordered materials have been delivered and that there is no transport damage. Report any damage to the seller immediately and note it on the delivery note. Damaged materials must not be installed!

  • Store the panels on crossbeams at least 20 cm above the ground, protected from direct precipitation.
  • Keep coloured panels in sealed packaging for no longer than 4 weeks.
  • Galvanised panels in sealed packaging – for no longer than 1 week, because white rust can form in damp conditions.

Roof deck and battens

The Classic profile has strict requirements for the flatness of the battens: the deviation over a length of 5000 mm must not exceed 3 ‰ (1.5 mm). Uneven battens can stop the “Click” joints from locking and create a wavy surface.

  • Underlay (breather membrane): required – it leads condensation out of the roof structure. Fix it horizontally to the rafters, then hold it down with counter battens (min. 22×50 mm, 32×50 mm recommended).
  • Battens: dry timber battens of min. 22×100 mm (32×100 mm recommended).

Starter sheet and installing the panels

For the Classic profile, the eaves flashing (C) must be installed first. The straightness of its outer edge is critical – it determines the alignment of all rows of panels. It is best to install the gutter, or at least the gutter brackets, before the starter sheet.

  • The panels are installed from right to left.
  • The first panel must be fixed fully before the second panel is installed – the next panel covers the fixing screws of the first, and they can no longer be reached.
  • The eaves edge of the panel is slid behind the starter sheet and secured – the eaves area is a double sheet without through-fixing screws.
  • Each following panel is slid in next to the previous one, and the “Click” joint is pressed down by hand or with a soft-soled shoe, from the eaves towards the ridge.
  • Only step on the flat parts of the panel, not on the seam.

Thermal expansion

Thermal expansion is an especially important consideration for the Classic profile: with a temperature difference of 60 °C, a panel can expand by up to 1 mm/m. An 8-metre panel can differ in length by ~10 mm between winter and summer.

  • The side edges of the panels have factory-made slotted holes – the fixing screws must not be screwed “all the way” (down to the batten surface), because this blocks the expansion compensation and can deform the “Click” joint. Place each screw in the centre of the slot, so that the profile can move freely in both directions as it expands. Placing all the screws at one end of the slots, or in a mixed order, prevents thermal expansion and can cause buckling in the profile!
  • The top end of the panel is not fixed to the top batten – it is left free to compensate for expansion upwards. The ridge support and ventilation element (B) is fixed only to the panel, not to the battens.
  • It is best to install the panels without lengthwise joints. If joining is needed, use the extension (H); overlap – at least 250 mm; the joint must be over a batten; the joints must be staggered, no closer than 700 mm.

Screws and consumption

Screw type Use Consumption
4.2×25 mm small head, without sealing washer, stainless Fixing Classic panels to the battens (through the edge of the panel) ~6 pcs/m²
4.8×20 mm with sealing washer drill point, hot-dip galvanised Fixing flashings (sheets) to the panels ~5 pcs/lm
4.8×28 mm with sealing washer sharp point, hot-dip galvanised Fixing flashings to timber as needed

Use tin snips or other non-abrasive tools for cutting. Never use an angle grinder with an abrasive disc – the sparks damage the coating and cause corrosion at the cut edges. Brush away metal filings immediately.

Installing the flashings

  • Eaves flashing (C) – installed first, before the panels; the straightness of its outer edge is critical.
  • Valley (G) – installed before the panels, from the bottom up; overlap at least 200 mm.
  • Verge (D) – installed from the bottom up after the panels; overlap at least 50 mm.
  • Ridge support and ventilation element (B) – fixed only to the panel, not to the battens; 20-30 mm from the outer edge of the ridge.
  • Ridge (A) – installed last; overlap 100 mm; do not join in the overlap area.

Safety at work

Always wear work gloves, soft-soled shoes and thick work clothes. When lifting panels, make sure nobody is standing underneath. Never stop a sliding panel with your hand – this can cause serious cuts. Use roof ladders or a personal safety system to move around on the roof.

The Classic profile is always installed from right to left. This is the opposite of many other types of roofing. It follows from the design of the “Click” joint system – each following panel slides under the right-hand edge of the previous one.

The Classic hidden fixing system means that the second panel covers the fixing screws of the first. As soon as the second panel is slid in and pressed down, the screws of the first panel can no longer be reached. That is why the correct position and final fixing of the first panel are very important – the straightness of all other rows of panels depends on it.

It is not required, but it is recommended – especially for rooms under a metal roof where rain noise can be disturbing. The SoundControl material significantly reduces noise from both rain and thermal expansion. Two solutions are available: a factory-applied SoundControl layer or a separate sound-absorbing strip fitted during installation.

It depends on the coating. Matt Pol can be installed from 0 °C; Pural BT and Pural BT Matt from -15 °C. Galvanised and Al-Zn profiles are not coated, so they have no coating temperature limits. In cold weather the material is stiffer – take care when cutting and bending.