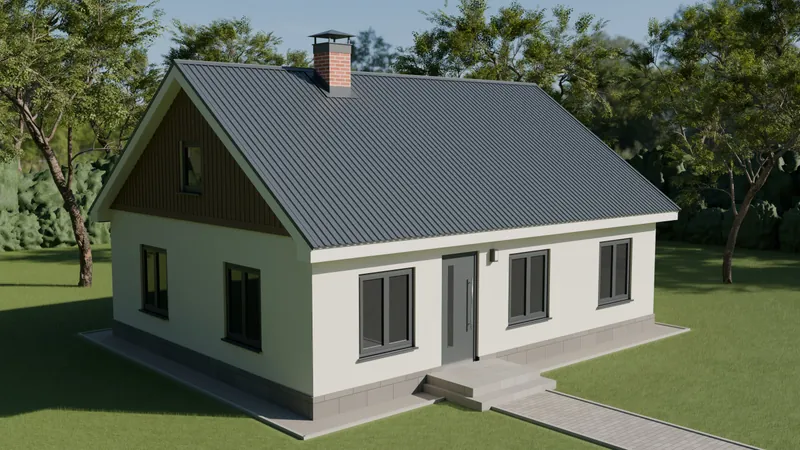
Trapezoidal profile TP20
Price from 8,29 € / m² incl. VAT6,85 € / m² excl. VAT
Excl. VATIncl. VAT
The price depends on the coating, material thickness and quantity ordered.
Classic house, TP20, RR23 Dark grey See how it looks on a house TP20 in the roof visualiser - choose the colour, rainwater system and accessories.

The trapezoidal profile TP20 is a versatile type of profiled steel sheet used for both roofing and wall cladding. The profile comes in three versions depending on the use: TP20 R – for roofs, TP20 A and TP20 B – for walls, with a slightly different trapezoid configuration for the best water drainage in each position.

Technical specifications of the trapezoidal profile TP20


Trapezoidal profile TP20 cross-section and dimensions

Use Roofing (R), wall cladding (A, B)
Material thickness 0,45–0,60 mm
Profile height 18 mm
Cover width 1100 mm
Coatings Galvanised, Polyester, Matt Pol, Pural BT, Pural BT Matt, PVDF
Minimum / maximum profile length 500–8500 mm
Minimum roof pitch 10° (8° with a double side overlap)

TP20 profile versions

Version Use Description
TP20 R Roof Trapezoid configuration optimised to drain rainwater down the roof slope
TP20 A Wall Wall cladding version that can be installed horizontally or vertically
TP20 B Wall Alternative wall version with a slightly different trapezoid profile

General information

The trapezoidal profile is fixed with screws in the bottom of the profile wave, to the battens or to the load-bearing steel structure. This differs from a hidden fixing system (like the Classic profile) – the screws are visible, but each screw has an EPDM sealing washer that stops water getting in through the screw hole.

The cover width of TP20 (1100 mm) makes it a cost-effective solution for large industrial and agricultural projects as well as for private homes.

The TP20 A and TP20 B profiles have no pitch requirements – they can be installed vertically or horizontally on walls. For the roof version TP20 R, the minimum pitch is 10°; at a lower pitch a double side overlap must be used, which allows the pitch to be reduced to 8°.

TP20 R is the roof version, with a trapezoid configuration that drains water down the roof slope as well as possible. TP20 A and TP20 B are wall versions with a slightly different profile configuration, designed for vertical or horizontal wall cladding. All three versions have the same basic dimensions – 1100 mm wide and 18 mm high.

Yes – TP20 is a versatile material. The TP20 R version is used for roofs and the TP20 A or TP20 B version for walls. Note that there are no pitch requirements for wall cladding, but the minimum pitch for the roof version is 10° (or 8° with a double side overlap).

Yes – TP20 is a common choice for the roofs and walls of industrial and agricultural buildings, because the 1100 mm width allows fast installation and economical material use. There are no restrictions on the size or use of the building.

The TP20 profile is available in lengths from 500 mm to 8500 mm (longer lengths are possible in some cases). Ordering the length you need reduces leftover material and makes installation easier. Our specialists can help calculate the exact panel lengths and quantities for your project.

Yes – the TP20 profile made by SIA Toode has CE marking and a declaration of performance. The documents can be downloaded under “Documents”.

A full set of flashings is available for installing the TP20 trapezoidal profile – sheet metal parts for the ridge, verges, eaves, valleys and wall abutments. All flashings are available in the colours of the Toode RR catalogue and are made from the same coated steel as the profiles.

The main flashings

Ridge

Closes the ridge area. Fixed to the tops of the TP20 profile waves with 4.8×20 mm or 4.8×28 mm screws with sealing washers on both sides of the ridge, at a spacing of no more than 400 mm. The angle of the ridge must match the roof pitch. On low-pitched roofs it is recommended to install a ridge seal that closes the gap between the profile waves and the ridge. Overlap – at least 100 mm.

Eaves flashing

Installed before the profile panels. It leads water from the underside of the panels into the gutter and protects the boards from moisture. Fixed to the first batten at a spacing of no more than 500 mm. Eaves flashing overlap – 50 mm.

Verge

Closes the side edge of the TP20 profile, wrapping around the profile from the side and stopping water from getting under the roofing. The verge is fixed to the panel with 4.8×20 mm or 4.8×28 mm screws (spacing up to 800 mm) and to the board with 4.8×28 mm screws (spacing up to 800 mm). Installed from the bottom up; overlap – at least 50 mm.

Valley

Installed before the panels, from the bottom up. Under the valley there must be solid boarding at least 300 mm wide on both sides of the valley. The profile edge must leave at least 200 mm of the valley free. Overlap – at least 200 mm; the valley must run over the eaves flashing.

Abutment

Makes a watertight joint between a TP20 roof and a vertical wall – at a chimney, a higher wall or another perpendicular structure. The top edge of the sheet is inserted into a groove in the wall and filled with a durable sealant. Fixed to the panel with 4.8×20 mm or 4.8×28 mm screws at a spacing of up to 800 mm.

Fixing screws

Screw Use Consumption
4.8×28 mm with sealing washer sharp point, hot-dip galvanised Fixing TP20 panels to timber battens ~6 pcs/m²
4.8×20 mm with sealing washer drill point, hot-dip galvanised Fixing flashings to the panels; joining panel overlaps ~5 pcs/lm
4.8×28 mm with sealing washer sharp point Fixing flashings to timber as needed

We recommend ordering everything together to guarantee that the colours match. The flashings are made from the same coated steel, so the colour match is more accurate when ordered in one batch.

Yes – flashings can be made to individual order to suit the needs of a specific project. A flashing made to the exact size and configuration is often better and cheaper than a standard solution that has to be adapted on site. Contact our sales department.

The screw goes through the bottom
(the lowest part) of the profile wave, not through the top. This way the screw is in direct contact with the batten, giving a firm fixing. The EPDM sealing washer under the screw head stops water getting in through the screw hole.

This profile is available in the coatings listed below. The properties of each coating – thickness, corrosion and UV resistance, galvanising and warranty – are compared under Metal roof coatings.

Colour chart

The table shows which colours each coating is available in. Colours on screen are approximate – for an exact choice, ask for physical colour samples.

RR11 - Dark green
RR20 - White
RR21 - Light grey
RR22 - Grey
RR23 - Dark grey
RR2H3 - Anthracite
RR25 - Yellow
RR28 - Dark red
RR29 - Red
RR30 - Beige
RR31 - Light brown
RR32 - Dark brown
RR33 - Black
RR35 - Blue
RR36 - Light green
RR37 - Green
RR40 - Silver metallic
RR41 - Dark silver metallic
RR750 - Brick red
Zn - Galvanised
AlZn - Aluminium-zinc
Printech Camo - PX131
Printech FineStone - PB074
Printech Wood - PW371
* Approximate colour samples

Colour / coating table

Polyester MATT POL PURAL BT PURAL MATT BT PVDF PVC Natural metal Printed
RR11 ● ●
RR20 ● ● ●
RR21 ● ● ●
RR22 ● ●
RR23 ● ● ● ● ●
RR2H3 ●
RR25 ●
RR28 ●
RR29 ● ●
RR30 ●
RR31 ●
RR32 ● ● ● ● ●
RR33 ● ● ● ● ●
RR35 ●
RR36 ●
RR37 ●
RR40 ● ●
RR41 ● ●
RR750 ● ●
Zn ●
AlZn ●
Printech Camo ●
Printech FineStone ●
Printech Wood ●

Pural BT or Pural BT Matt gives the best corrosion resistance (RC5+) and the longest warranty – the best choice in the long term. Polyester is an economical choice for standard conditions. Matt Pol is a good compromise between price and quality with an attractive matt look.

Polyester with RC3 corrosion resistance is enough for standard rural or industrial conditions. However, if the hangar is in a coastal area, an aggressive industrial environment, or if you want a longer maintenance-free lifespan, it is better to choose Matt Pol (RC4) or Pural BT (RC5+).

The samples on screen are approximate – the real colour depends on the monitor calibration, the lighting and the chosen coating (glossy or matt). We recommend asking for physical samples and looking at them in natural daylight.

Declaration of performance – TP20

The CE marking document for the TP20 profile. It confirms compliance with European construction standards and lists the main performance characteristics.

Download DoP TP20 (PDF) →

Information on receiving and storing products

The document describes how to receive the delivered profiles correctly, what to check on delivery and how to store the material before installation. Following these guidelines keeps the material warranty valid. Main principles: coloured panels in sealed packaging – for no longer than four weeks; galvanised – for no longer than one week.

Download the guidelines (PDF, LV) →

“White rust” on galvanised steel

This document is important if you have chosen the galvanised steel TP20. It explains what white rust is, how it forms during storage, how far it affects the quality of the material and how to prevent it. In a damp environment, galvanised steel in closed packaging without air circulation can develop a white salt deposit within a few hours.

Download the document (PDF, LV) →

Yes, provided that the installation is carried out according to the SIA Toode installation guidelines. Use the correct screws with EPDM sealing washers, follow the overlap rules and do not put screws in places not intended for fixing.

Galvanised panels in sealed packaging may be stored outdoors for no longer than one week. In cooler or damper weather, white rust can form much faster. It is best to store galvanised panels dry indoors or install them immediately after delivery.

Steel roof profiles are a versatile material used on many types of buildings – both private and public. Profiled steel sheets are useful not only for roofing but also as a wall finish. TP20 is one of the most widely used steel profiles in Latvia thanks to its versatility, easy installation and affordable price.

Uses of the TP20 profile:

  • Family houses
  • Apartment buildings
  • Public buildings
  • Hangars and warehouses
  • Balcony cladding
  • Fences and temporary fencing

The TP20 R version is used for roofs; the TP20 A and TP20 B versions for walls.


Installation summary

Installing TP20 is relatively simple and is often done without special tools. The main conditions are a correct batten system, an underlay and the right screws. Below is a summary of the main installation stages.

Delivery and storage

When receiving the goods, check that all ordered materials have been delivered and that there is no transport damage. Damaged panels must not be installed! Report any damage to the seller within 14 days of the delivery date.

  • Store the panels on crossbeams at least 20 cm above the ground.
  • Coloured panels in sealed packaging – for no longer than 4 weeks.
  • Galvanised panels in sealed packaging outdoors – for no longer than 1 week.
  • Lift and carry the panels, do not drag them – the sharp edges can damage the coating of the panel underneath.

Roof deck and battens

Before installation, check the condition of the load-bearing roof structure, the strength of the rafters and the straightness of the roof plane. Any defects in the battens must be fixed before the panels are installed.

  • Underlay: required for insulated roofs. Fix it horizontally to the rafters, then hold it down with counter battens (min. 25×50 mm, 32×50 mm recommended). The underlay is interrupted at the ridge, and after the battens are installed, a strip of underlay (about 300×300 mm) is fixed in the ridge area.
  • Battens: min. 22×100 mm (32×100 mm recommended) dry timber. Nail the battens to the counter battens with hot-dip galvanised nails – at least 2 nails at each crossing point.
  • Batten spacing: depends on the panel thickness and the roof pitch. Ask our specialists for the most suitable spacing for your project.
  • In valleys solid boarding at least 300 mm wide must be installed on both sides of the valley.

Eaves flashing and installing the panels

The eaves flashing is fixed before the panels are installed. It is best to install the gutter, or at least the gutter brackets, before the eaves flashing.

  • The panels can be installed either from left to right or from right to left. When starting from the right (laying each panel on top of the previous one), the previous panel helps hold the next one and makes it easier to keep them parallel to the eaves.
  • First fix the first two panels with one screw each, align the bottom edge parallel to the bottom batten, and only then screw them down fully.
  • The panels overlap each other by one wave (at the sides). If the pitch is lower than standard, a two-wave side overlap must be used.
  • The bottom edge of the panel must extend 30-50 mm beyond the bottom batten.
  • Lengthwise, panels are joined with an overlap of at least 200 mm; the joints must be staggered.
  • Only step on the bottom of the wave, as close to the batten as possible – never on the top of the wave.

Screws and fixing rules

Screw type Use Consumption
4.8×28 mm with sealing washer Fixing panels to timber battens (through the bottom of the wave) ~6 pcs/m²
4.8×20 mm with sealing washer Fixing flashings to the panels ~5 pcs/lm
4.8×20 mm with sealing washer Joining the side overlaps of panels ~2 pcs/lm

Use tin snips or other non-abrasive tools to cut the panels. Never use an angle grinder with an abrasive disc – the sparks damage the coating and cause corrosion at the cut edges. Brush away metal filings immediately.

Safety at work

Always wear work gloves, soft-soled shoes and thick work clothes. When lifting panels, make sure nobody is standing underneath. Never stop a sliding panel with your hand – the sharp edges can cause serious cuts.

You can start from either the left or the right side. When installing from right to left, each following panel lies on top of the previous one – the previous panel helps hold the next one and makes it easier to keep them parallel to the eaves. It is best to start with the longest panel – on a rectangular roof this is the edge panel.

The standard side overlap is one wave. If the roof pitch is lower than standard (under 10°), a two-wave side overlap must be used to increase watertightness. Silicone is not used in the joints.

Yes – an underlay (breather membrane) is required for all insulated metal roofs. It leads condensation water out of the roof structure. Alternatively, you can use panels with a factory-bonded condensation-absorbing material (DripStop) – in that case no separate underlay is needed.

Yes – the TP20 A and TP20 B versions are designed specifically for wall cladding. They can be installed vertically or horizontally. There are no pitch requirements for walls. To find out which version (A or B) suits your wall cladding best, contact our specialists.

It depends on the coating: Polyester and Matt Pol – from 0 °C; Pural BT and Pural BT Matt – from -15 °C; PVDF – from -10 °C. Galvanised steel has no coating temperature limits. In the cold, metal is stiffer – take care when cutting.